Are you considering installing a natural gas range in your home?

I did it myself and I have some great practical advice for installing a natural gas stove in your home. I also had to add onto the existing natural gas supply line in my home to make this work.
It’s been quite an ambitious learning experience for me but it’s also been a rewarding one, as well.
Why? Because it was easier than I thought and I saved a wad of cash.
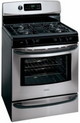
We switched out our old electric coil range with a natural gas stove. If you’re thinking about doing the same or possibly want to extend your existing natural gas lines to a new outdoor grill, for instance, I invite you to get comfortable and heed my advice.
The same principles will apply in dealing with cast iron pipe. Put your common sense on overdrive and read on.
Part 1 – The Steps I Used To Install The Gas Range
Disclaimer: I am NOT a licensed plumber and this is not a how-to website. I am simply sharing my experience with installing a gas range. Ask advice from professionals before considering this type of project and add my practical experience for good measure. If you have ANY reservations about attempting this type of project, call a professional to handle it for you. This is NOT a project to be taken lightly. Check with your homeowners’ insurance carrier for details on this project before attempting. If you choose to follow the techniques, approaches, and methods shown here, then you follow them at your own risk. In no way will the publishers of this website be held liable for any injuries or damages, direct or consequential, incurred by any person who attempts to follow the examples shown herein.
The information in this article assumes that you have natural gas previously available in your home.
#1 – Research brands and comparison shop.
Make sure you do your homework and shop the best brands out there.
#2 – Pull out the old stove and measure the space for the newly chosen gas range.

Most stoves are 30 inches wide. Our old range was a drop-in model so I needed my measurements to be accurate due to switching to a free-standing range.
#3 – Retreat to headquarters (home), mull it over and make a decision (aka harass my wife into letting me have the stove I craved).
#4 – With measuring tape and digital camera in hand, we went out and made the purchase.
TIP: If the model you are purchasing is on the sales floor I suggest you take measurements and take photos of the range and where the gas connections are on the stove.

Be sure to inquire about the gas connector and diameter. Also ask what type of electrical connection you will need to have available for the stove to operate on.
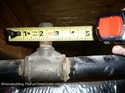
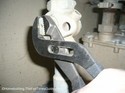
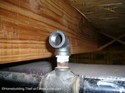
#5 – One of the first things I did was locate the nipple where I would be connecting the additional pipe and measured the outside diameter.
Cast iron pipe that is 7/8″ outer diameter equals 1/2″ pipe in the store, meaning that they only go by the inside diameter. I took measurements from where it would connect all the way to where it would end up behind the stove.

#6 – I read up on the possibility of tapping into the existing gas line in my house.

I saw that if I was careful and followed code and common sense I could save myself a bundle.
I figured I saved somewhere between $250 to $350 dollars based on conversations with a contractor and employees of Home Depot and Lowe’s. I spent just under $50 on materials including $20 on a new pipe wrench.
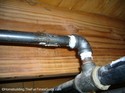
Other supplies included: 2 elbows, 1 t-connect, 1 long piece of pipe and 3 short lengths (all cut to my measurements), cap, T2 pipe joint compound and the valve. I had the associate at Home Depot cut to length all 3 pieces.
He cut them, reamed them and then threaded them, all on one machine. It took about 10-15 minutes due to the constant interruptions from other customers and Depot associates asking this guy questions.
I obviously had one of the more experienced employees on site. That made me feel good about the advice I was given and confirmed what I had read on a couple of other websites.

#7 – I shut the gas off at the meter.
Once I had all of my supplies on hand and made an announcement to everyone in the house not to strike a match, etc., I shut off the gas at the meter on the outside of the house. It only takes a pair of pliers to accomplish this task.
TIP: BE SURE TO LINE UP THE HOLE ON THE PART YOU ARE TURNING WITH THE STATIONARY HOLE ON THE METER. THEN PUT A PADLOCK THROUGH IT UNTIL YOU HAVE COMPLETED THE JOB. You only need to turn it 1/4 of a turn. It’s a ball valve so it will turn either way indefinitely. Just line it up and put a lock on it.
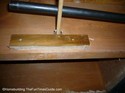
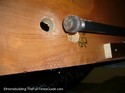
#8 – Next, I pre-drilled 1-inch holes for the pipe in the floor behind the stove and through the floor joist for the 90-degree turn I had to make.
I also made a temporary brace between the floor joists for the unattended end of the 90 inch pipe to rest on while I made the connection.
In hindsight I should’ve waited to drill the hole through the joist until I had the pipe from the main line connected and was ready for my next move through the joist. Or I couldv’e taken off about 3 inches from the 90 inch pipe to accurately align it towards the hole through the floor joist for the pipe.
Why? Because by the time I was at the point of putting the pipe through the hole in the joist, I had added two 90 degree elbows (one from the existing gas line and one to turn towards the joist), thus adding about an inch+ per elbow due to the threads and the elbow itself.
The result was that I ended up re-drilling another hole next to the originals. What can I say — We live and learn!
#9 – When I was finally ready to begin, the BIG moment was upon me. I eased the cap off of the nipple to begin

Nothing herky-jerky here, folks. Nice and slow. In my case, it was a little tough to start turning the cap due to the old joint compound — but it soon gave way. Be sure to open some windows to let the residual gas escape.
It will smell for a little while but it soon dissipates. Feel free to take a short break.
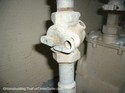
#10 – Joint compound
I basically just “painted it” onto the male threads thick enough to not be able to see the threads and that’s it. No gooping and layering. It’s not a cake!
I went from connection to connection, putting the “pipe dope” only on the male threads. I tightened each connection firmly but didn’t over do it so I wouldn’t split or crack a pipe. Hercules need not apply!
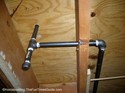

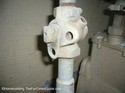
#11 – The final piece in the gas pipe installation puzzle was the gas valve.
Simply follow the installation directions on the package.
Part 2 – The Gas Leak Test
This part of the job is EXTREMELY IMPORTANT. No shortcuts allowed here. When everything was completely connected:
#1 – I turned the gas back on at the meter and mixed a concoction of half and half of dishwashing liquid and water in a small glass per the Home Depot guy and what I had read on do-it-yourself websites.
#2 – I stirred it around and grabbed a rag.

#3 – I then proceeded to dab the rag in the glass and dabbed it onto each and every connection looking for bubbles.
#4 – You MUST give a 360 degree look on each connection. Otherwise, you’re rolling the dice with your life and your loved ones.
#5 – If you don’t see ANY bubbles forming, you’re golden. GIVE THE BUBBLES TIME TO FORM. The bubbles may not form right away so take your time with this step…please!!!
#6 – Then wait a day, or 2 for the joint compound to cure and go back and cleanse each joint with clear water. This will prevent the compound from corroding over time. We received a rebate from our local gas company – check to see if there are any available where you live.
Part 3 – Preventing Problems With Combustion Equipment
Use a properly sized range hood fan if you use a gas range.
All kitchens should have exhaust ventilation to remove odors and excess moisture associated with cooking. While there are various ventilation strategies for kitchens, a range hood is the most common. When using a gas range, a range hood directly vented to the outside should be used to capture the combustion products. These range hoods should be sized correctly. For a typical kitchen range the American Society of Heating, Refrigerating and Air-Conditioning Engineers (ASHRAE) and the Home Ventilation Institute (HVI) recommend 100 cfm. Larger fans may need to have makeup air provided to avoid excessively depressurizing the house, causing backdrafting or other problems.
After installation of combustion and/or ventilation equipment, combustion equipment should be tested to be sure that it functions properly.
It is important that your installer conducts a worst-case depressurization test. This combustion safety test determines if any non-sealed combustion appliances will backdraft or spill combustion products into the living space. Tell your installer this test should use an established procedure such as Appendix D of the International Fuel and Gas Code or ASTM E1998 “Guide for Assessing Backdrafting and Spillage from Vented Combustion Appliances”.
— the EPA on Indoor Air Quality in Homes/Residences
Writing a home building blog that chronicles new homes during different phases of construction from a consumers’ point-of-view is rather unique and loads of fun. Basically, my tips are a collection of checklists for what I think should (and should not) go into building a quality home. So let’s have fun seeing what’s new in the housing market these days!